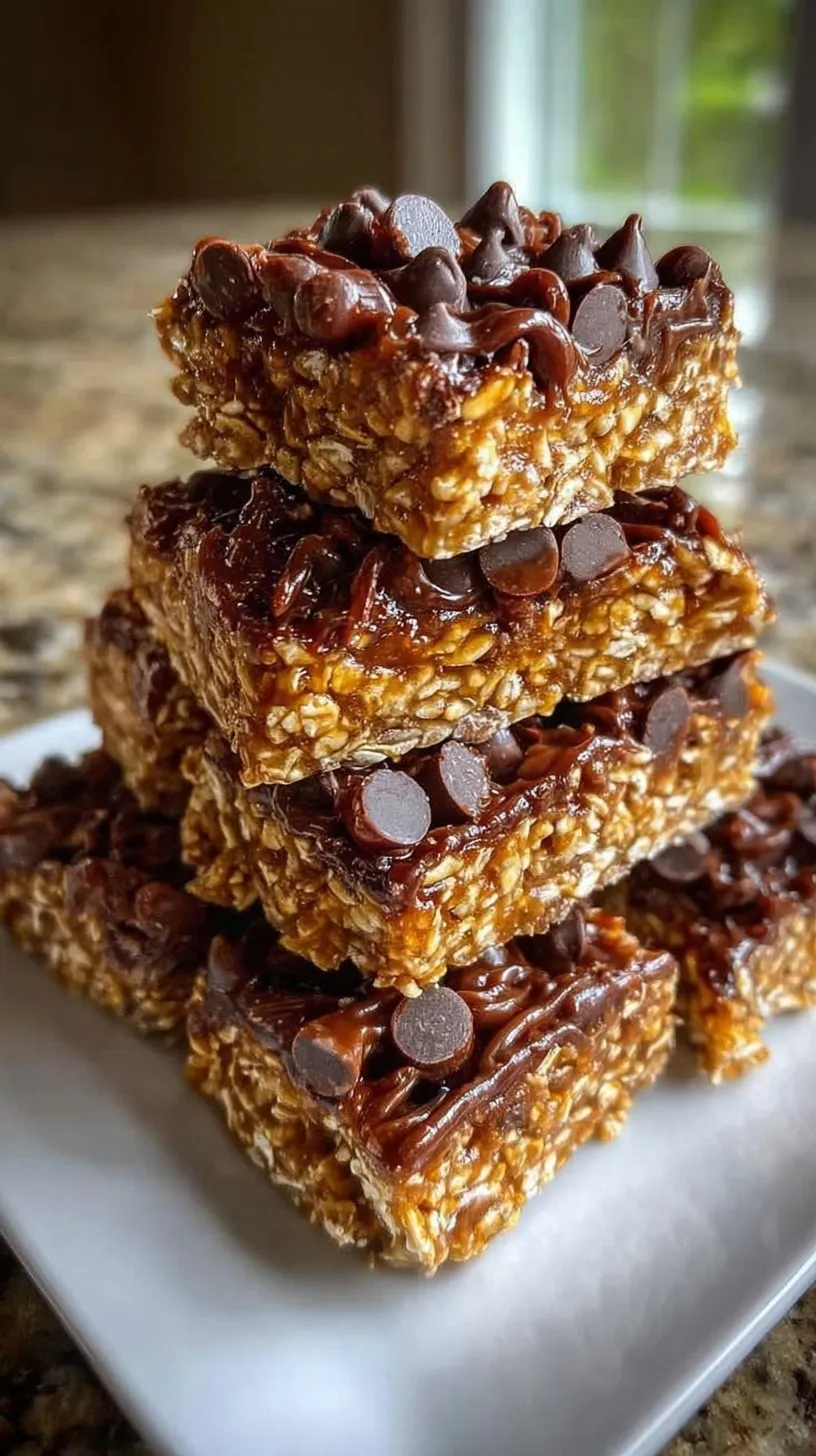
Stop Buying Store-Bought: These Easy Protein Bars Are Your New Obsession
Ditch the expensive, chalky store-bought snacks. These Easy Protein Bars are no-bake, high-protein, and perfect for your weekly meal prep routine.
It is 3 PM and your energy is crashing hard. You need a snack that actually works as hard as you do. These Easy Protein Bars are the chewy, delicious answer to your midday prayers. They are perfect for a healthy reset or your weekly meal prep routine. You are going to love having these ready in your fridge.
Stop settling for those expensive, chalky bars from the grocery store. Most of them are filled with mystery ingredients and way too much sugar. These homemade bars give you total control over what goes into your body. They are dense, satisfying, and packed with high-quality protein to keep you fueled. You won’t believe how much better they taste than the wrapped versions.
Why You’ll Love This Recipe
This recipe is a total game-changer for anyone with a busy schedule. You can whip up a whole batch in just fifteen minutes of active time. These bars are the ultimate meal prep secret weapon for your work week. They stay fresh and delicious for days in the refrigerator. Your wallet will also thank you for skipping the pricey supplement aisle.
The texture is exactly what you want in a protein snack. They are thick, slightly soft, and perfectly chewy thanks to the rolled oats. You get a balanced boost of complex carbs and protein in every bite. Whether it is a post-workout fuel or a quick breakfast, these deliver. They are also 100% kid-approved and great for school lunches.
Simple Method
No oven? No problem at all because this is a no-bake masterpiece. You just mix your dry ingredients and fold in the wet ones. It really is that simple to get professional results at home. Even if you are a total beginner, you can master this recipe. The shortcut to success is just a microwave-safe bowl and a spatula.
The hardest part is waiting for them to set in the fridge. You just need sixty minutes of patience while they firm up. After that, you are ready to slice and enjoy your hard work. You will feel like a pro food creator when you see these bars. They look and taste like they came from a high-end health shop.
Ingredients You’ll Need
You probably already have most of these pantry staples in your kitchen right now. Using high-quality almond butter makes a huge difference in the final flavor profile.
- 2 cups rolled oats
- 1 cup vanilla protein powder
- 1/2 cup creamy almond butter
- 1/4 cup honey
- 1/3 cup unsweetened almond milk
- 1/2 teaspoon vanilla extract
- 1/4 teaspoon fine sea salt
Step-by-Step
- Line an 8×8 inch square baking pan with parchment paper for easy removal.
- Whisk together the rolled oats, protein powder, and sea salt in a large bowl.
- Heat the almond butter and honey in the microwave for 20-30 seconds until fluid.
- Stir the vanilla extract into your warm almond butter and honey mixture.
- Pour the wet ingredients into the dry oats and stir until a stiff dough forms.
- Add almond milk one tablespoon at a time if the mixture seems too crumbly.
- Press the mixture firmly into your prepared pan using a flat spatula.
- Refrigerate for at least 1 hour until the bars are firm to the touch.
- Lift the parchment out and slice into 8 equal rectangular bars with a sharp knife.
- Store your bars in an airtight container in the fridge for up to one week.
Best Ways to Enjoy It
These bars are the perfect on-the-go breakfast for those frantic Monday mornings. Pair one with a hot cup of black coffee for a great start. They also make an incredible post-workout recovery snack after a tough gym session. The combination of protein and carbs helps your muscles recover fast. You can even crumble them over Greek yogurt for a protein-packed parfait.
If you want a little indulgence, drizzle them with a bit of dark chocolate. This turns a healthy snack into a crave-worthy treat that feels like dessert. They are sturdy enough to toss in your gym bag or backpack. Just make sure to keep them cool so they stay perfectly firm. You will never want to go back to store-bought again.
Keep It Fresh
Proper storage is the key to keeping these bars tasting amazing all week. Always keep them in an airtight container to prevent them from drying out. They stay perfectly chewy when kept in the refrigerator for up to seven days. If you want them to last longer, you can freeze them individually. Just wrap them in parchment and place them in a freezer bag. They will stay fresh for up to three months this way.
Tips for Best Results
- Press the mixture down very hard in the pan to ensure dense bars.
- Use a flat-bottomed glass to get an even, smooth surface on top.
- Choose a protein powder that you actually enjoy the taste of solo.
- If your almond butter is very dry, add a tiny bit more milk.
- Don’t skip the salt because it balances the sweetness of the honey.
- Wet your hands slightly if the dough is sticking while you press it.
- Use a sharp chef’s knife to get those clean, professional-looking edges.
- Let them chill fully before slicing or they might crumble apart.
Ways to Switch It Up
- Add a handful of mini dark chocolate chips for extra sweetness.
- Swap the almond butter for creamy peanut butter for a classic flavor.
- Mix in some dried cranberries or raisins for a chewy fruit burst.
- Use chocolate protein powder instead of vanilla for a double chocolate bar.
- Sprinkle some flaky sea salt on top before chilling for a gourmet finish.
Common Questions
Can I use a different type of protein powder?
Yes, but keep in mind that different powders absorb moisture differently. Whey usually works best, while plant-based powders might require more almond milk. Always add the liquid slowly to reach the right consistency.
Are these bars gluten-free?
They can be if you use certified gluten-free oats for the base. Always check your protein powder label to ensure it is also gluten-free. This makes them a great safe snack for many diets.
What if my bars are too crumbly?
This usually means the mixture was too dry before you pressed it. Next time, add an extra tablespoon of almond milk or honey. Make sure you are pressing down firmly with a heavy object.
Stop making excuses and start making your own fuel. You deserve a snack that tastes as good as it makes you feel!
— Jasmine
Ingredients
Method
- Line an 8x8 inch square baking pan with parchment paper, leaving an overhang on two sides.
- In a large mixing bowl, whisk together the rolled oats, protein powder, and sea salt until thoroughly combined.
- In a separate small microwave-safe bowl, combine the almond butter and honey; heat for 20-30 seconds and stir until the mixture is fluid.
- Stir the vanilla extract into the warm almond butter mixture.
- Pour the wet ingredients into the dry oat mixture and stir with a heavy spatula until a thick, stiff dough forms.
- Add the almond milk one tablespoon at a time if the mixture is too crumbly to hold together; the dough should be moist but not sticky.
- Transfer the mixture to the prepared baking pan and press down very firmly with a flat spatula or the bottom of a glass to ensure the bars are dense and cohesive.
- Refrigerate for at least 1 hour until the mixture is firm to the touch.
- Lift the parchment paper out of the pan and slice into 8 equal rectangular bars with a sharp chef's knife.
- Store bars in an airtight container in the refrigerator for up to one week.